Quantcast
Channel: CAD – SolidSmack
Viewing all 288 articles
Browse latest View live

Model of the Week: LEGO Technic Porsche 911 [Dream Car!]

$
0
0
LEGO-TechnicPorsche-911-GT3-RS-00

One of my 200 dream cars begins with Porsche and ends with 911 GT3 RS. Until I can sell enough plasma to purchase a used one that needs the rusted out floorboard replaced, I’ll settle for the highly prized 1:8 scale LEGO Technic version. And until one of you buy that and ship it to me, I’ll settle for gazing up this 3D model of the beautifully bricked out Porsche 911 FT3 RS, built by GrabCAD user DK.

DKs byline is “A single D, for that single dose of pimpin'” which is absolutely accurate. He’s been using Autodesk Inventor since R4 and claims that “Chicks dig guys who make stuff” which we won’t argue with. at. all. because IT’S TRUE. He churns out all sorts of LEGO models–highly accurate LEGO models–and has the process down to an art in Inventor, even to the point of creating an Inventor LEGO tools Library.

The Porsche model is just beautiful in every way. He has all 228 numbered LEGO pieces, including engine and interior details, plus decals. For those without Inventor, he has included a STEP file – you provide the giddy laughter after opening it up in your modeling software to explore. Though I usually share items that can be 3D printed, this would be wonderful to use in creating some renderings, building some alternate assemblies or adding in a small, 1:8 scale 3D representation of yourself.

You can download the files on GrabCAD! (Bonus! Grab one of his other LEGO models here!)

(OH, and here’s that link to the actual LEGO Technic Porsche 911, in case you wanted it or, ya know, wanted to ship one over.)

Have a model you think everyone needs? Share the link and details with us here!

LEGO-TechnicPorsche-911-GT3-RS-01

LEGO-TechnicPorsche-911-GT3-RS-02

LEGO-TechnicPorsche-911-GT3-RS-03

Read Model of the Week: LEGO Technic Porsche 911 [Dream Car!] at SolidSmack.


Autodesk Announces Gift of $25,000 in Product Design Software for Every Fab Lab

$
0
0
feature

When it comes to equipping tomorrow’s designers and engineers with the tools they need to create compelling projects today, few companies have been as generous in offering access to software, tools and even fabrication facilities as Autodesk has.

While the company’s Fusion 360 design software has always been free to use for students and those who otherwise don’t use it for commercial projects, they recently expanded their generous offer to include their entire Product Design Collection to those on the Fab Foundation‘s global network of workshops and makerspaces. Facilities that qualify for the $2,460 per year collection will each be granted 10 licenses –– or approximately $25,000 per year to access Autodesk’s leading design and engineering software tools.

“At each step of the way, we are learning more about how best to support Fab Labs so we can improve and deepen our relationship,” explains Autodesk’s Rama Dunayevich, Senior Manager of Brand Partnerships. “We are using an initial one-year renewable subscription term to collect feedback and data to be in a better position to consider further expansions, refinements and customization based on that data.”

In total, the Product Design Collection includes 14 software programs and utilities that cover the full end-to-end product design process:

  • 3ds Max
  • AutoCAD
  • AutoCAD Architecture
  • AutoCAD Electrical
  • AutoCAD Mechanical
  • AutoCAD 360 Pro
  • Fusion 360
  • Inventor Professional
  • Navisworks Manage
  • ReCap 360 Pro
  • Rendering in A360
  • Vault Basic
  • Cloud storage (25 GB)
  • Factory Design Utilities

To qualify as a registered Fab Lab on the Fab Foundation’s network of global Fab Labs, a facility must include at least five different types of fabrication tools and be free and open to the public part-time. Those interested can apply for the Product Design Collection now.

Read Autodesk Announces Gift of $25,000 in Product Design Software for Every Fab Lab at SolidSmack.

Model of the Week: Raspberry Pi 3 Model B [Berry Awesome!]

$
0
0
raspberry-pi-3-3d-model-grabcad-00

This fabulous model? This is a Raspberry Pi 3 Model B. You know, the device you can use to brain a hexapod, integrate a complete home automation system or link to form an impressive Raspberry Pi SuperComputer.

Yes, this wee device has more compute capacity and capability than a couple of inept presidential candidates and a candidly similar lack of moral conscience, being that it is, in fact, a machine. Alexandre Willame modeled this sweet little thing with all “the bottom parts, photorealistic textures, and components updated to match the Official Raspberry Pi documentation.”

Modeled in SolidWorks 2016, Alexandre has included the SolidWorks .sldprt file, along with STL, IGS, STEP files and the Raspberry Pi 3 spec sheet. I held my Raspberry Pi 3 up to this model and, folks, it matches beautifully. What can you use this model for? Well, you could use it to fashion a RasPi case, construct a rack for 100 Raspberry Pi’s or render out a sweet desktop wallpaper to show everyone how stoked you are about the palm size computer!

You can download the files on GrabCAD! (Bonus! Grab the Complete Raspberry Pi Starter Kit here!)

Have a model you think everyone needs? Share the link and details with us here!

raspberry-pi-3-3d-model

Read Model of the Week: Raspberry Pi 3 Model B [Berry Awesome!] at SolidSmack.

Model of the Week: Cable Hive [Cord Honey!]

$
0
0
cable-hive-3d-print-cable-managment-00

Store those spare cables in your cheek bags no longer *all SolidSmack readers simultaneously spit cords out of their mouths*, there are other means of keeping those cords, cables and wires organized and out of the way.

Sure, you could buy cable wraps, cable ties, or hire a butler to keep all that in order for you, but that’s just too costly, especially when that butler starts giving you lip about having too may charging cables. Instead, Thingiverse user Juanfly has a handy storage solution to keep all your wires in one place. The Cable Management Hive is ten tiny honeycomb compartments to hold cables, thumb-drives or other sundries and notions laying about your desktop.

Mr. Juan has provide a small, medium and larger version .stl for the design he first modeled in SketchUp. The photo shows the small version with an approximately 24mm diameter compartment. The medium size measures ~26mm and the large ~39mm. Of course, you can scale, adjust and remix this simple design to your desired size and configuration. Me? Ima make a 1 meter version to store my slingshot, honey and beetle collection.

You can download the files on Thingiverse! (Bonus! GeoDave wrote an OpenSCAD that gives you even more options! Grab other hive storage sizes and the .scad file here.)

Have a model you think everyone needs? Share the link and details with us here!

cable-hive-3d-print-cable-managment-01

Read Model of the Week: Cable Hive [Cord Honey!] at SolidSmack.

This Is How to Model and Construct a Functional 3D Printed Violin

$
0
0
violin-assembly-gif

The one instrument I would have my bodyguards play as we sauntered down the street is a violin. They’re sound is just wonderfully ominous and mysterious, while equally enchanting and… mysterious.

After building a traditional wooden Guarneri-style violin, Brian Chan, an Engineer at Formlabs, took it upon himself to design a functional (and quite good sounding) 3D printed violin. Now, you may think, big F-hole deal– print the body in one go and DONE. But no, with the printer’s build area and size of the violin, even the body had to be designed and printed as separate parts. And Brian, with his suave violin making ways, approaches the build of this a completely different way that you might imagine.

First, if you know about string instrument construction, you know every bit, from the tonewood and lining to any support or bridge, matters. It’s difficult to think of how the body could be constructed in multiple pieces and still sound like anything more than a bucket with strings. So, when I saw this exploded view of the final version, I had my bodygaurds stop and scream, “Great gobs of Stradivari shellac!” …with a slight vibrato at the end.

formlabs-onshape-rhett-price-3d-printed-violin-07

violin-scroll-gif
violin-assembly-gif

Here’s what Brian says about the process:

I wanted to design a 3D-printed violin to have the same internal structure: a hollow shell with the soundpost near one side of the bridge, and a strengthening bar of material along the inside of the front. Later, I would experiment with the dimensions of these various elements, but it was important to get the basics right.

And the modeling:

Because these surfaces are based on a grid, they can have up to four natural singularities, which would correspond to the four corners of a rectangular grid. Luckily, the violin body has four corners, while the rest of the boundaries are smooth. In Onshape, I was able to define this shape as a loft, with corners of the cross-sections located at the corners of the violin. To constrain the loft to the right shape, I used the C-shaped outlines and the centerline contour as guides. These cross-sections and guides are based on actual outlines of a Stradivarius violin, which can be found in the same book I used to construct the traditional Guarnerius violin.

And the printing:

I printed the prototypes using the Form 2 and Formlabs’ White, Black, and Tough Resins. Stereolithography (SLA) made sense for this project because the violin needed to be strong enough to withstand several different directional forces, and SLA parts are isotropic, meaning that they are equally strong in every direction. Also, the complex geometry of the instrument demanded tight tolerances for both small and large features, which the Form 2 was able to print consistently.

Through it all, Brian constructed five different 3D printed prototypes. The final version is made up of 26 3D-printed parts which can be printed in five overnight prints on a Form 2. The other bits can all be easily bought a your local Violins R Us.

How does it sound? The violin parts in the video below were recorded using the 3d printed violin as played by violinist Rhett Price:

I’m not sure if a 3D printed white resin violin would be accepted among the purists in the Boston Philharmonic, but the sound coming from this is good enough to last through at least one session of intense outdoor unamplified playing by a professional violinist wiggling about.

You can read the entire breakdown on the process at the Onshape blog. The 3D print files are available to download via Pinshape. Grab it here. You can also request a free sample part of Formlab’s white resin by visiting the Formlabs site here.

formlabs-onshape-rhett-price-3d-printed-violin-01

formlabs-onshape-rhett-price-3d-printed-violin-02

formlabs-onshape-rhett-price-3d-printed-violin-03

formlabs-onshape-rhett-price-3d-printed-violin-04

formlabs-onshape-rhett-price-3d-printed-violin-05

formlabs-onshape-rhett-price-3d-printed-violin-06

Read This Is How to Model and Construct a Functional 3D Printed Violin at SolidSmack.

The Wolfe Supercharges Your Laptop by Supplying Desktop-Class GPU Power

$
0
0
SSFeature

Although MacBook Pro laptops have never been as powerful as they are today, there are still many performance limitations for serious power users that rely on desktop-class specs for working (or playing) efficiently. For many, this usually boils down to the lack of serious graphics card power. With today’s professional design software, video games and virtual reality platforms demanding more power than ever, what gives?

Enter The Wolfe.

Created in a dorm room by a trio of Harvard students (sound familiar?), The Wolfe is a portable desktop GPU that contains desktop-class power for connecting via Thunderbolt to supercharge a MacBook or any other compatible laptop computer. The result is a dramatically improved desktop-quality performance –– the creators claim a 500 to 1000 percent performance boost –– on a laptop.

Made from injection molded ABS, the 7.8 in x 5.4 in x 2.6 in box weighs just 2 pounds (3.2 for the Wolfe Pro) –– meaning it can stash in a backpack or side bag when not in use similar to a large external storage drive.

1471918353549

“Laptops sacrifice performance for portability. For more intensive tasks like gaming, VR, and high-speed rendering, your laptop is held back by it’s weak, mobile graphics processor. Because of this, you’re expected to use a bulky, expensive desktop computer for these tasks. If you can buy an external hard drive to easily expand your storage, why can’t you do the same for your laptop’s performance?”

The Wolfe contains an NVIDIA GTX 950 GPU – 768 cores operating at 1024MHz, for a peak compute power of 1.57 TeraFLOPS

The Wolfe Pro runs on an NVIDIA GTX 970 GPU – 1664 cores operating at 1050MHz, for a peak compute power of 3.49 TeraFLOPS

“The Wolfe began over a year ago in a Harvard dorm room when we realized how much we wanted, and needed, this to exist,” explain the creators –– AKA the ‘Wolfepack’. “Inspired by the online eGPU community, we built our first prototype in the summer of 2015. Our vision was to create an affordable, easy-to-use product that would change personal comp forever.”

The Wolfe starts at $399 over on Kickstarter.

Read The Wolfe Supercharges Your Laptop by Supplying Desktop-Class GPU Power at SolidSmack.

Model of the Week: Søren Rose Bespoke Furniture [Designery!]

$
0
0
soren-rose-studio-tribeca-3d-models-00

If you were to walk into my house, you would tuck your chin and say, “This space is a perfect illustration of a complete lack of modern design aesthetic.” And that’s ok. I would still invite you in and give you two handfuls of spicy, meat-laden chili.

You would then say, “You need to have Scandanavian design studio Søren Rose do a makeover on your sorry excuse for a living space.” I would give you more chili and say, “Already got it covered! I’ve downloaded all the 3D models of their incredibly, incredible design and will be looking at them occasionally, THANK YOU VERY MUCH. More chili?”

If you’re in the same boat, you too can download the beautiful furniture designs of the Danish craftsman to admire, render, use in your own room designs or simply spin around and imagine them in your own home. The 3D models of many collections are provided from the popular TriBeCa collection to the Church Chair, the Sideboard, the Edgar Stool and many, many succulent light fixtures. Each has a .3dm, .3ds, and .dwg file provided and there are even more photos on the website available of each piece alone and in their natural environment of modern class.

You can download the files from the Søren Rose Studio website!

Have a model you think everyone needs? Share the link and details with us here!

soren-rose-studio-furniture-01

soren-rose-studio-tribeca-3d-models-01

soren-rose-studio-tribeca-3d-models-02

The post Model of the Week: Søren Rose Bespoke Furniture [Designery!] appeared first on SolidSmack.

Model of the Week: Pip (Storage) Boxes [For Your Things!]

$
0
0
pip-3d-printed-storage-drawers-00

“Ello Pip!” Why hello yourself! I’m glad you showed up because I need to talk to someone about storage. I have 397 Mason jars filled with nuts, screws, stamps, snail shells, dried shellac, dry lint… well, you get the idea. I need a better storage solution.

“Did you see this splendid, stackable, sensational set of 3D printed storage drawers?” I see them now, thank you! And while I could order a wall-size set of storage drawers online and have them here tomorrow, 3D printing them is so much more challenging! Plus, imagine the combinations one could come with. Yes, I’m fairly certain the ultimate use for 3D printers is printing storage for other 3D printed items like prosthetics, space ship ventilation ducts and extra lung tissue.

Created by Andrew Askedall, not only is this a 3D printed storage solution for all your bits and bobs. It’s a ONE PIECE, 3D printed storage solution for all your bits and bobs. The units all print as one piece. The inside of the drawers are angled so no supports are needed and if anyone ask why your printing storage drawers, you can lift one slowly in front of their face… then open and close the drawer rapidly until they leave.

All .stl files are provide and even separated so you can print a different color/material for frame and drawer. Splendid indeed! If you’re freaking out about labels, Andrew has eliminated the most challenging part of this project by providing a PDF template. Phew.

You can download the files from the Thingiverse.

Have a model you think everyone needs? Share the link and details with us here!

The post Model of the Week: Pip (Storage) Boxes [For Your Things!] appeared first on SolidSmack.


First Glimpse at Vectary Online 3D Modeling Tool

$
0
0
vectary-online-3d-modeling-cad-cloud-00

Well, we’ve been waiting a long six months, but we’ve finally received access to Vectary, the highly anticipated, online 3D modeling tool, and we’re all sorts of excited to pop open a browser and see what it can do.

When we first saw Vectary, we got a glimpse of a simple, intuitive looking interface with an object library, parametric and procedurally generated geometry, templating and various export options. With the attraction of an ALWAYS free, “no limits” 3d modeling system and an open API in the works, it has a lot going for it, but they’re coming into an arena of stiff competition with the likes of Onshape, already in the browser, and Fusion 360, with Project Leopard kicking off their own beta.

NOTE: Vectary is currently in Beta and this is an early look at what is currently possible with the online 3D modeling tool.

Vectary aims to combine mesh modeling, subdivision modeling and parametric design–all apparent from the interface layout and initial features and toolset. The Vectary UI is a beautiful, wide open environment with your modeling Tools to the left, your model Objects to the right, Snap and View setting at the bottom and Selection options up top.

The mouse controls all of your view controls–LMB to rotate, MMB/Scroll to Zoom, and RMB to pan. Currently, there is no RMB context menu, so you’ll be accessing modeling and selection tools through the on-screen toolbars.

vectary-online-3d-modeling-cad-cloud-03 The Vectary user interface – model by George Solo

The geometry and terminology should be familiar to any who have used other 3D modeling systems, but at it’s core, it’s a polygonal modeler, so you’ll be working with geometry by selecting polygons (faces and edges). The Tools provide you with primitives to get started quickly or you can sketch using Lines on an existing surface or the plane of a selected item’s (Coordinate) Gizmo. Once you have some lines, a face, or set of faces, you can Extend, Bridge, Bevel, Slide, Weld and Cap Boundaries. You also have a Slice tool to divide faces into smaller faces.

As you progress through the modeling process, Vectary keeps track of your Objects and actions in a list to the right of the screen. Expanding each item provides some additional options for Max polygon size, Smoothing and Edge Sharpness and quick toggles for Revolve and Mirroring. Beyond this, a simple set of scene options are available to control Units, Grid, Background, Lines, Camera and Shadow.

vectary-online-3d-modeling-cad-cloud-05

Currently, you can import an OBJ file and have options to export the model as OBJ or STL. I was able to successfully export an OBJ file, import it into KeyShot with hierarchy maintained and add materials to each part.

Now, just because it’s stated that Vectary will always be free, that doesn’t mean there won’t be a paid subscription option. In fact, a “Vectary for Business” is planned. The free version includes 3D modeling tool access, five private projects, unlimited public projects, import/export and non-commercial use. The Business version is sure to add to these options. No pricing has been announced.

I love the experience in this already. Though I was expecting a bit more capability, the direction is already very promising. It’s incredible easy to get started modeling organic shapes, modifying them, moving between different objects and exploring designs. It’s also a great example of how far we’ve been able to push OpenGL/WebGL web interfaces.

I’ve provided them feedback with a list of things I’d like to see. I’d like to see what you think though, find out if it’s what you were expecting and what you’d like to see yourself. If you haven’t had a chance to check it out yet, you can request beta access here.

The post First Glimpse at Vectary Online 3D Modeling Tool appeared first on SolidSmack.

Model of the Week: Shellmo Robot Centipede [With 32 Legs!]

$
0
0
shellmo-robo-micropede-00

Why aren’t there more excessively long, undulating-legged centipede style robots?! That’s the question I always ask a packed room at the local retirement village. Sure, they throw mashed potatoes and teeth at me, but late at night, they wonder the same thing as they fall asleep to the sound of sci-fi battle sounds on that mixtape I gave out to everyone.

Shellmo is the creation of Sho Yoshida, inspired by the sadly discountinued, yet still impressive Gakken Mechamo Centipede of the mid-00s. It’s an incredible 32 legs of creepy motorized motion made extra creepy by a pair of excessively large humanoid eyes. Outside providing hours of fun and the inevitable nightmares, this is a build that’s so open-source, he’s provide all the details on multiple websites, including the 3d model, the circuit layout, the Aurduino source and the app to control your new friend.

The 3d models are provided as SketchUp (skp), Belnder (blend) or .3ds and .stl. You can get all the details on their website, an overview of the parts or drop a couple bucks to get the pre-built chassis on their Shapeways store, or snag the files and share your own build on Thingiverse.

Sho says, “Assembling the motor module requires some skill,” but I know you all are up for it. And if not, you can hop over to 3D Hubs and print one out. Pay attention to the making of notes though!

You can download the files from the Shellmo website. Or from Thingiverse!

Have a model you think everyone needs? Share the link and details with us here!

shellmo-robo-micropede-01

shellmo-robo-micropede-02

The post Model of the Week: Shellmo Robot Centipede [With 32 Legs!] appeared first on SolidSmack.

Model of the Week: Archimedes Screw [Hellenist-astic!]

$
0
0
archimedes-screw-makerbot-learning-01

You know how it goes. You make one Archimedes screw and it goes missing. You make another Archimedes screw, it goes missing and you discover a small band of pygmy gopher people have been stealing them for their underground rhubarb growing racket. You want to deal with it, but… THEY’RE JUST SO DANG CUTE and those rhubarb pies are to die for.

Fortunately, the Makerbot Learning crew has put together an awesome physics + engineering + history lesson to give you and others the ability to 3D print as many miniature Archimedes screw devices as you need. It’s a fantastic (Helenist-astic, HA!) project for anyone interested in building simple machines or bringing an understanding of engineering principles and 3D design to younger minds. As they describe it:

The Archimedes screw is a device believed to be invented by Archimedes, one of the world’s greatest scientists, in the 3rd century B.C. It was most often used to transport water from lower ground to higher ground for purposes of irrigation, flood prevention, and more.

We’re pretty sure Archimedes used it to transport piles of grapes from the floor to his mouth though… Oh wait, that’s what I use it for. The project is much like other Makerbot Learning lessons. They provide the complete overview and detail behind the design, the lesson plan and activities, and the 3D print files, of course. This model was created using Onshape and is a perfect model for learning and understanding more about 3D modeling.

You can download the files from Thingiverse. Or from Thingiverse! (BOnus! They’ve also made the Onshape file public. You can view and use the model here!)

 
Have a model you think everyone needs? Share the link and details with us here!

archimedes-screw-makerbot-learning-02

archimedes-screw-makerbot-learning-03

The post Model of the Week: Archimedes Screw [Hellenist-astic!] appeared first on SolidSmack.

First Creo Unite, Then Inventor AnyCAD, Now SolidWorks 3D Interconnect

$
0
0
solidworks-2017-3d-interconnect

Like Creo and Inventor, SolidWorks can now add non-native CAD files to assemblies without translation.

I hopped up to Boston for D3DLive last Monday. It rocked.

I met up with our old friend Jeremy Regnerus (the man is back!), and he walked me through the new 3D Interconnect feature in SOLIDWORKS 2017. I was impressed.

Summary: You can now import CATIA, NX, PTC Creo, Solid Edge, and Inventor parts and assemblies directly into SolidWorks assemblies, complete with live-updating geometry, mates, colors, materials, and full assembly hierarchy. SolidWorks even keeps track of BREP id’s in the geometry so your mates update when changes occur in the source files just as if it were reading native SolidWorks files. The process is so seamless you could almost forget you’re working with non-native data. Have a gander:

For a SolidWorks user, this is huge. When I’m working with an engineer in Creo, we don’t have to do the STEP-it-out monkey dance back and forth to share files–I can link directly to their files in Dropbox and use it as if it were native.

startrek

It gets better. If you import a non-native part using 3D Interconnect, you can edit the part in SolidWorks. No, it does not give you access to the parametric history from XYZ CAD system, but it at least creates a native SolidWorks part file and inserts the non-native file into it using the Insert Part feature, allowing you to make solid modeling edits to your heart’s content.

But wait, what about Creo Unite, released mid-2014? Short version: Same thing. Check it:

Oh, and what about AnyCAD in Inventor 2016? Hmm.

So, I spent an hour on the phone this morning with Gavin Quinlan at PTC to clear up the details on Creo Unite. Turns out it’s almost identical to the new SolidWorks offering, at least for CATIA, NX, and SolidWorks files (Inventor and Solid Edge files are only partially supported by Unite). At first, I thought that Creo Unite might lack BREP-level mating for non-native components, but it turns out that it does. I also thought that editing non-native parts would be non-associative, but that turned out to be incorrect as well. Creo Unite is ostensibly the same product as SolidWorks 3D Interconnect, but about three years earlier.

Having only just discovered the AnyCAD thingy from Autodesk, I haven’t yet spoken with them about the details. Still, by viewing the video above along with a few others, it seems the workflow is pretty much identical. (I’ll leave it to the ADSK posse to fill us in in the comments below.)

Who cares?

The PTC guys were kind enough to help me understand the market segmentation: these products are for anyone who needs to a) consolidate heterogeneous CAD data into a single system or, b) collaborate in real time in a multi-CAD environment.

a) You’re a manufacturing company using Creo, and you’ve just acquired a company that uses SolidWorks. Your Creo engineers now need to add those SolidWorks parts into their assemblies, but don’t want to go through the expensive, painful, and largely redundant process of translating the entire part catalog to Creo all at once. Creo Unite lets those engineers simply open the specific SolidWorks parts and assemblies needed without translating them. PTC calls this data consolidation, because the SolidWorks data is essentially static, and all future development will be one in Creo.

b) You’re a small engineering consulting firm using Creo, and you frequently work with outside designers, suppliers, and customers using different CAD systems. Everyone involved is continually refining and improving their designs, making it painful to translate and re-import updated data. With Creo Unite, you can simply insert CATIA, NX, and SolidWorks files directly into your assemblies with full associativity, so any changes that your partners do in their respective CAD tools are automatically updated in Creo.

Both use-cases are compelling, and both are possible with all three platforms: Creo Unite, Inventor AnyCAD, and now SolidWorks 3D Interconnect.

PTC says that the most common use for Unite is, in their experience, consolidation. Their customers like that they are able to assimilate data that was created in other CAD systems, but then use Creo for development moving forward. For me, however, the collaborative aspect is much more exciting.

Why now?

In a growth market, it’s easier to convert fresh n00bs than it is to poach your competitor’s customers. Proprietary formats are important for platform-specific optimizations and features, but they are also a convenient way of guaranteeing that those hard-won customers don’t switch teams on you. You want to provide some interoperability, yes, but you want to do it in a way that keeps your competitors at arm’s length. If possible, you’d rather just pretend they don’t exist. (Using interchange formats like STEP allow you to market interoperability without even mentioning the names of your competitors–a very attractive feature!)

I take these new products as a sign that the MCAD industry is finally reaching a level of maturity that requires players to acknowledge and support one another’s products. It’s no longer possible to pretend that any given company will be able to function with one-CAD-fits-all thinking. Even if a given business is willing to standardize its entire workforce on a single platform, it can’t force its suppliers, consultants, and customers to do likewise. If you want to be competitive in MCAD, you’re going to have to make peace with a multi-CAD world.

Why does Adam care?

This is really exciting to me for several reasons.

First, it will make it easier for me to collaborate. I’ve done jobs with Inventor users, and it would have made life much easier if we’d been able to share data seamlessly.

Finally, it means that the industry is shifting in such a way that MCAD vendors will be forced to compete with one another more directly. I can continue to work in my MCAD tool de jour knowing that if I decide to switch tomorrow, I can pick up where I left off. That’s an empowering feeling.

Your thoughts?

Are you using any of these products? All of them? What do you think?

I’m also interested to know how a cloud service like Onshape or Fusion 360 might compete with this kind of functionality. Wouldn’t the need to update files be a significant impediment? And I doubt these interop plugins are going to work with native Onshape data anytime soon. Food for thought.

Rock.
Adam

EDIT (6 October):

I had a conversation with Jon de Hartog from Autodesk about Inventor AnyCAD, and he confirmed my assumptions about AnyCAD. It is, I believe, effectively equivalent to Unite and 3D Interconnect.

Jon emphasized several points worth mentioning. First, where Creo Unite was motivated largely by customers wanting efficient data consolidation as described above, Inventor AnyCAD was more driven by users working in supply chains where vendors and customers may be using different CAD systems.

They also offer associative import of STEP geometry (so does Creo), a feature that they say many users find useful. They are especially proud of their associative 2D->3D workflow, allowing users to import DWG files from AutoCAD, extrude them into 3D, and have associative updates if and when changes happen in the DWG.

I asked why they think these systems are in vogue at the present moment as opposed to a decade ago, and he said that “distributed teams” are “definitely” more common today than they have ever been. This rings true for me, as most of my clients are remote, and most use different tools than I do.

Correction:

The original article said “you can use 3D Interconnect on previous-version SolidWorks files. That means that if my client is working in 2015, I no longer have to convert the entire assembly to 2016 in order to use it. I can just import it as-is, and it remains compatible with the client’s SolidWorks install.” This was false. SolidWorks files are imported as normal, and 3D Interconnect has nothing to do with them.

The post First Creo Unite, Then Inventor AnyCAD, Now SolidWorks 3D Interconnect appeared first on SolidSmack.

Model of the Week: Bugging Eyeballs [You Look GOOD!]

$
0
0
bugging-eyeball-3d-print-model-mask-00

Here it is October and you haven’t put any thought into a public display of your talent and creativity for that one day a year where dressing a baby like a taco is perfectly fine.

baby-taco-costume

FOR SHAME. You’re a creative person. This should be easy. Here are some ideas: a Minotaur with a cupcake addiction, A walking collage of deer antlers, an Ewok with butterfly wings, or a headless guy carrying a body in a box.

guyinabox

If none of those work for you, or you’re pressed for time, Stephen Kongsle has a model you can quickly print, paint and strap to your gnoggin–bugging eyeballs–and they’re a thing of beauty. The model is super simple and comes in two versions–one with embossed veins, and one without. He’s provided .stl files for both sets and the original Blender file. Using transparent, elastic beading cord, you can attach the giant eyes to your face (or chest) for a super creepy look. I’d personally like to see these painted up even more realistic with some molding rubber eye bags.

Inspired? I am. You can download the files from Thingiverse! (Bonus! Check out Stephen’s Low Poly Mask too!)

 
Have a model you think everyone needs? Share the link and details with us here!

The post Model of the Week: Bugging Eyeballs [You Look GOOD!] appeared first on SolidSmack.

Model of the Week: Top 5 3D Printed Halloween Costumes [All 100% Creepy!]

$
0
0
3d-printed-halloween-costumes-3d-models-06

I bet it’s been YEARS since you dressed up in a costume. What’s up with that? You’re a creative type, right? Able to model up a doomakahizzy or a shnizzle in five minutes flat, AND look good doing it. You probably have a 3D printer (or access to one) too. Well, we’ve rounded up five (make that, six!) simple, creepy models you can print out to accentuate your already supa-fly style.

1. Halloween Spider Mask

There’s nothing creepier than spiders… except a massive spider wrapping its legs around your face. Download this model here.

3d-printed-halloween-costumes-3d-models-01

2. Finger Hand

Hands are disturbing. Hands on the end of each finger are even more disturbing. Send adults and small children reeling in disgust with ten Finger Hand models for each finger. Download this model here.

3d-printed-halloween-costumes-3d-models-02

3. Doll Eye

What could be easier than printing a giant button to stick over your eye, or EYES. A little make-up and your a horror movie star in the making. Download this model here.

3d-printed-halloween-costumes-3d-models-03

4. Dilbert Tie & Glasses

I know, I don’t normally wear a tie either, but I’d make an exception here. I’m sure you already have the shirt, so all you need now is the tie, to dress as everybody’s favorite engineer. Download this model here.

3d-printed-halloween-costumes-3d-models-04

5. BFG Ears

It was a popular book, that’s now a popular movie. If you already look like a wrinkly, old giant, this ears will complete the look. Download this model here.

3d-printed-halloween-costumes-3d-models-05

6. BONUS! Demon Baby

Typically, you don’t want things bursting out of your chest cavity, or your belly cavity, or any cavity. So this is sure to earn some churn, especially if you do actually have a baby in your belly. Download this model here.

3d-printed-halloween-costumes-3d-models-06

 
Have a model you think everyone needs? Share the link and details with us here!

The post Model of the Week: Top 5 3D Printed Halloween Costumes [All 100% Creepy!] appeared first on solidsmack.com.

I Just Used SketchUp in the Browser, And It's Awesome.

$
0
0
sketchup-browser-cad-cloud-01

SketchUp is now in the Browser.

Trimble sent out an email earlier announcing my.SketchUp and, as you can imagine, it looks just like SketchUp–a wide open modeling area, simple interface and east-to-use tools. All the basic functionality is there and, on top of that, it’s super smooth. The toolbars however are positioned to the left (drawing tools) and right (styles, Layers, display, etc).

Trimble says, “my.SketchUp is the core SketchUp modeler, tuned to work in modern web browsers. Draw, orbit, push-pull: make anything you can imagine in SketchUp, anytime you imagine it.”

It’s incredibly fast and responsive. In fact, you don’t even need a login to use it. Just open my.SketchUp and start modeling. It’s connected to 3D Warehouse, so you can find and add models or upload your model, all from the browser. You have the ability to download the model (.skp) immediately or, with a Trimble account (or Google login), save it to Trimble Connect. Oh, Don’t accidentally refresh though–they’ve set it up to prompt you to load the unsaved model, but it doesn’t always capture the last few operation you made.

Here’s a quick overview about how to use SketchUp… in the browser.

The post I Just Used SketchUp in the Browser, And It's Awesome. appeared first on solidsmack.com.


Model of the Week: Walking Table [Eat on the Go!]

$
0
0
walking-table-crab-ble-02

I once went for a jog. True story. It was a bit challenging holding a cheeseburger and attempting to eat it whilst trotting down the roadside, especially in the incredible jogging shorts I was wearing. While that image sinks in, just imagine yourself in the same situation and how nice it would be to have a table jogging alongside you. That may just be possible.

Ekaggrat Singh Kalsi has created a walking table. Called the ‘Crab-ble’ (Get it!), it’s a 12 legged structure based off Theo Jansen’s amazing Strandbeest creation. Ekaggrat started out studying the leg motion and capturing it in several test models to get the movement and tabletop braces just right.

walking-table-crab-ble-01

His third model is what you see in the photos, 3D printed from ABS and ready to serve up a full buffet! …A small, full buffet since this is a prototype and measures a mere 15.75″ x 6.7″ x 5.1″ (400 mm x 170 mm x 130 mm). His plan is to construct a full size table using bamboo and steel. He hasn’t done it yet, so here’s your chance to do it first.

3d-printed-walking-table-02

There are five .stl files that make up the file set along with the original SketchUp model file. Although detail and assembly drawings are lacking, Mr. Kalsi

You can download the .stl files on MyMiniFactory or the .stl and SketchUp file on Thingiverse.

Have a model you think everyone needs? Share the link and details with us here!

3d-printed-walking-table-00
3d-printed-walking-table-01

The post Model of the Week: Walking Table [Eat on the Go!] appeared first on SolidSmack.

PMDesk Puts Project Management and Your Tasks Inside SolidWorks

$
0
0
pmdesk-project-management-solidworks-00

I’m not sure if all Engineers dream about project management… Who am I kidding. Of course we do. Although for many it’s more on the side of a nightmarish, overtime-induced hypostasis with an awkward high-five from the boss when you print out a perfectly color-coded, wall-size Gantt chart (that will have to be re-printed in two days because, yeah, everything freakin’ shifted).

Options for project management abound, integrated and stand-alone, a todo list, a spreadsheet that invariably result in an email-chain-party someone didn’t get invited to. Awww. As one of the largest software consultants in Europe, DPS Software is all too familiar with the options, the process and the inherent pains. Nothing out there solved the issues, particularly when it came to project management capabilities within 3D CAD software. So, they developed a solution themselves, PMDesk.

PMDesk is “Project Management for Engineers” with specific compatibility developed for project management capabilities inside SolidWorks. If you’ve not been much involved in PM tasks, you may not understand the sudden rush of hope that statement provides for those who are one milestone away from a cardiac arrest.

Their overview explains it best:

PMDesk has wide range of functionality. You can manage whole project portfolio, which means that all projects can be managed in one window and bigger projects can be organized with sub-projects. Every project has a set of settings – including basic project information like name, number, state, location. You can assign projects for particular customers (list of these customers can be defined and imported from other database/system). Every project could have separate group of persons, responsible for each part like design, simulation, technology etc.

Every task has assigned person, can be planned manually or automatically and could have additional resources (like cars, rooms rent etc.). You can also add files from SOLIDWORKS PDM system, report progress, set up priority and many more.

There is possibility to control many other aspects like budget (including work time costs) or resources (within the meaning of cars, computers etc.) in terms of availability and cost. PMDesk has extended functionality associated with change management – you can describe change in many fields and add ECO documents from PDM system (together with creating ECO from PDM template). Talking about control – PMDesk has multiple reports prepared for different user roles – from manager to project member. You can track resources availability, performance in all project and within specified ones, overdue tasks and many more.

One of the greatest PMDesk option is that software works on-line, and that means that you are assigning tasks and planning resources within whole project portfolio. PMDesk provides info about conflicts and suggest first available date.

Paweł Worożyszczew, with DPS Software, tells us they “started with PMDesk application 2.5 years ago. We have seen the demand from our customers for a planning tool which helps them to manage design activities for projects.” After getting PMDesk into their hands, more functionality was requested, adding reporting, budgeting and change management with task lists that’s captured by it all. “As a next step we created ‘To-do list’ for engineers to allow them to have their own list of tasks with the possibility to report statuses of completion. Today we have much more functionality added, but these basics are still the most important and help users solve communication problems in their organizations.”

PMDesk is compatible with SOLIDWORKS PDM Professional, able to import users directly, use your PDM templates and serial numbers or add files and folders to your projects and tasks. With that, you have the ability to define a workflow that connects with tasks, then see those tasks inside SolidWorks that are assigned to you or add your own tasks.

pmdesk-project-management-solidworks-01

This is another case of WHERE HAS THIS BEEN ALL MY LIFE, sure to ease the PM process for managers and users alike. They have two version of the software available on their website, PMDesk Editor €500 ($550 USD) for full project portfoliio management, reports and administration and PMDesk Contrbutor €250 ($275 USD) for Task list creation, editing, time reporting and SOLIDWORKS interface.

Is there another Project Management solution out there you’ve used? This is the first I’ve seen with this functionality, plus the integration with SolidWorks. What are you using?

pmdesk-project-management-solidworks-05

pmdesk-project-management-solidworks-02

pmdesk-project-management-solidworks-03

pmdesk-project-management-solidworks-04

The post PMDesk Puts Project Management and Your Tasks Inside SolidWorks appeared first on SolidSmack.

my.SketchUp Browser Test Drive (and hotkey secrets)

$
0
0
SkillCoach-first mysketchup model

Last week we sent out a quick post to spread the word about Sketch Browser beta. This week I had the opportunity to delve a little deeper.

So when I fired up the App, Mr. my.SketchUp himself “Josh” (the avatar, no relation to Señor Mings), greeted me with a casual but blank stare. He made me feel right at home and gave me plenty of room to roam around and explore. So that’s exactly what I did. In this post I’ll share three snippets; drawing tools, keyboard shortcuts and browser limitation specific to the build of my.SketchUp Beta available at the time of this post.

Drawing Tools

Being that I was itching to model something, I headed straightway to the drawing tools. Positioned on the left side of the browser, I found all the standard drawing and editing goodies. My personal favorite tool, by the way, is the FollowMe tool. To keep the menu nice and compact, additional tools are hidden under each default tool icon. A simple click on any of the drawing tools (with a little arrow along the right edge of the icon) causes a few extra tools to reveal themselves via a fly out submenu. Below is a Drawing tool infographic put together for you courtesy of us here at SolidSmack.

mysketchup-drawing-tool-menus-01Drawing tools fully expanded

Now being a Sketchup novice, figuring out how to use the drawing tools and the behavior of the geometry I was laying down, the experience had me somewhat scratching my head. I had visions of modeling a nice pair of earphones or something like that. But, in the end, I had a bunch of miscellaneous piece parts and shapes.

SkillCoach-first mysketchup model
Objects made after my first my.SketchUp modeling session “Woo Whoo”

UI Navigation and Workflow

Given the wide expanse of the canvas, I quickly got tired of hopping far left and far right to grab the next tool. I thought “There has got to be keyboard shortcuts for this baby!” After a little digging on the my.SketchUp help center, forums, and a general Google search. I learned 1) no keyboard shortcut cheat sheet for my.SketchUp Browser exists, and 2) shortcuts had to be mapped differently owing to various browsers already owning keys. So it was not feasible to achieve an apples-to-apples translation of the keyboard mapping from SketchUp Desktop. Armed with this discovery, I began to “hunt and peck” until I unraveled the mystery of the shortcut keys used in my.SketchUp Browser as they exist today. So behold perhaps the first shortcut cheat sheet (mac). Enjoy!


mysketchup keyboard shortcutsHome-grown, Keyboard Smackdown coming at you! This list, best we can tell, captures the present browser keyboard functional mapping.

 Multi-Browsers

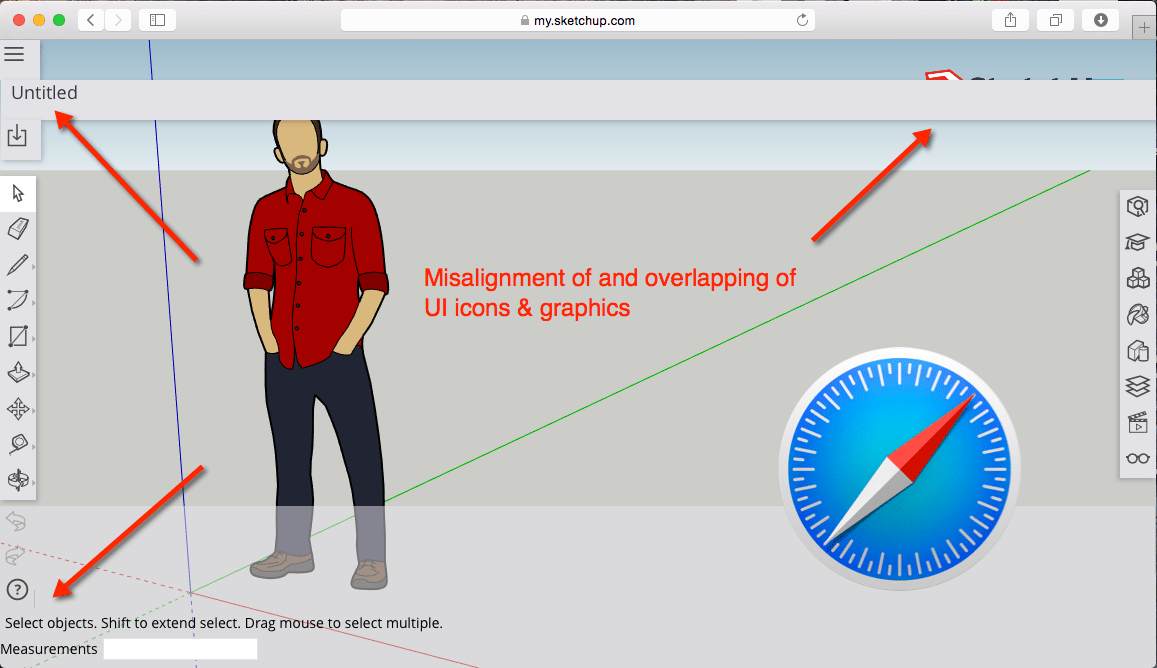
I did the bulk of my test drive running the App on Google Chrome and it was as smooth as silk! I met with similar success on Firefox and Opera. However, my one  hiccup came when I fired up my.Sketch on Safari. For whatever reasons the App did not display properly and graphic elements got jumbled up.

Chrome my.Sketch screenshot-01b
Chrome Browser displays all graphics and menu selections crisp and clean.
Safari browser does not display my.SketchUp environment properly. Misalignment and overlapping of graphics are distracting.

Well, there’s a few tidbits of what I learned in my first my.SketchUp Browser test drive. Perhaps you’ve had similar experiences and/or new discoveries. Feel free to give us a shout-out. Cause as they say, “It’s nice to share!”


The post my.SketchUp Browser Test Drive (and hotkey secrets) appeared first on SolidSmack.

Model of the Week: Low Poly Pun’kins [Jack-o-lantasitical!]

$
0
0
low-poly-pumpkins-00

low-poly-pumpkins-00

Well, THIS is timely. Why it wasn’t but four days ago that Simon, Adam and I were talking about how many tiny, 3D printed, low poly pumpkins we could hold in our mouth and still discernibly say ‘low poly pumpkin’– think ‘chubby bunny’ but with 3D printed pumpkins instead of marshmallows.

Sadly, our guesses were based on pure speculation, but now that David Hagemann has provided a set of sweet, low poly pumpkin prints, the competition can truly begin! David created nine different little low poly pumpkins, naming them Chompy, Slurpy, Crushy, Piercy, Slicey, Crunchy, Munchy, Smoochy and Squashy.

He designed them to either be snapped and stacked together or mounted atop a small LED light. Of course, the applications abound… You could create a necklace, put them in the eye holes of that cat skull you have on your desk, teach a chipmunk to jungle them or just spread the pumpkin love by throwing them lovingly at passers-by.

You can download the files on Thingiverse. (BONUS! Grab his torch size low poly pumpkin to set atop an outdoor light! Download here!)

Have a model you think everyone needs? Share the link and details with us here!

low-poly-pumpkins-01

low-poly-pumpkins-02

The post Model of the Week: Low Poly Pun’kins [Jack-o-lantasitical!] appeared first on SolidSmack.

Fusion 360: A Look Back

$
0
0
image02
image02

Presented by
image05

Here we are, 2016, and as you know, SolidSmack likes to look at what’s pushing product development ahead. Well, to look forward, it helps to look back… unless there’s a large bear, then you just want to skip the reminiscing and jump forward, hastily. We’ve got time, no bears, and a hefty dose of speculation that Autodesk is preparing something big for Fusion 360. So first, we’re going to look back at what set all this in motion.

It seems like such a short time ago that Autodesk’s wee seed of Fusion 360 was planted, growing into a dense forest of cloud-driven modeling power in just a few short years, with collaboration options and tools to match each stage of the product development process.

If you read our last series on  Fusion 360, you’ll recall those tools and what makes Fusion 360 different. I wrapped it up by saying, “The sculpting, part and assembly modeling are so different from what I’ve experienced before, and when you combine that with the collaboration, and then the simulation, and then the CAM capability, it’s certainly more than just CAD.”

I’m familiar enough with Fusion 360, but to get a broader view, I wanted to talk with someone who has been there all along. Steve Hooper is the Senior Director of Manufacturing Strategy and Business Development at Autodesk, so I’m pretty sure he’s spent some time among the roots of Fusion 360, wrapping his arms around the trunk and swinging gleefully from its branches.

I asked him a few questions. Some of it is what you would expect from someone at the corporate level of a software development company. But some of it provides those gems of someone involved in the inner workings of the software and knowing the struggles of the engineer or designer who needs the tools to get the job done.

Milestones. Every project has milestones. What are the top five milestones for Fusion 360 over the years?
It goes without saying, that the first key milestone would be the fact that we successfully changed the industry by launching the first cloud-based product development platform. This was magnified by being the first to market with a CAD/CAM solution for Mac. From there, we’ve advanced over the years, releasing new functionality just about every six weeks. Within that, we’ve hit milestones for the first cloud CAM solution and integrated simulation.

What has been the most unexpected outcome from a new feature in Fusion 360?
The creative use of Fusion 360’s sculpting tools. When we introduced sculpting we were aiming at industrial design and styling but I’ve seen a lot of unique applications that go way beyond what you’d expect. Users absolutely love the intuitive behavior, a more fluid approach to design and  results they can achieve in a shorter space of time.

There’s this guy, Ed Eaton, Senior Industrial Designer and Principal at DiMonte Group. Ed’s a huge SolidWorks fan, but used Fusion 360 for a charitable project he was doing in his local neighborhood. He was designing a skate insert for a kid at his local hockey team who has one leg shorter than the other. The spacer helps ensure the blades of his skates are in line. At Develop 3D Live in Boston this year, Ed demonstrated this process using Fusion 360 mesh and sculpt tools to capture the existing sole of the boot and then generate the spacer insert matched to the scan with a sculpted body. It took him about 20 minutes in Fusion 360 compared to the four hours he would have expected in SolidWorks. If you have time, I’d highly recommend checking out the recording. Ed’s a great designer, an authentic speaker and his presentation was highly informative.

A company named Grovemade collaborated with renowned audio designer, Joey Roth, on a set of desktop speakers so gorgeous, your jaw will drop. They used Fusion 360 to design and machine these works of art. At one point, right up against deadline they decided they needed to redesign the amp that accompanies the speakers. It was a risk because they had less than 48 hours, but with Fusion 360, were able to iterate quickly, collaborate remotely, and the result was stunning.

image04

How is Fusion 360 complementing/changing the product dev process? What are engineers and designers telling you about?
Fusion 360 is redefining the product development process, which historically has been defined by traditional silo’d software categories like CAD, CAM, CAE and PLM.  Fusion 360 includes all of these capabilities in one single, accessible cloud solution.  Not only is this a whole new category, but our accessibility (free for students and startups, $25/month for everyone else) levels the playing field.

This level of integration is unparalleled. One of our customers, Backhand Bikes, told us they were able to reduce their design and manufacturing software packages from eight to just one. And, as a result, they feel they’re bringing much more sophisticated products to market.

image00

What are the game-changing capabilities that Fusion 360 has brought to product dev?
There are so many capabilities Fusion 360 brings to the table — CAD, CAM, simulation, T-Splines, cloud rendering, drawing, documentation on Mac, mobile or PC at $25/month… need we say more? – but it’s not the individual capabilities that have been game-changing alone, it’s that all of it is integrated in one cloud-based, collaborative product development platform. That’s what has really set Fusion 360 apart from past software options for product developers.

One of my favorite Fusion 360 customers is a Dutch company called K-M-P Motorsports. They design and manufacture custom race car parts for some of the best brands in the field. They used to design in SolidWorks and ProE and primarily off-shore their manufacturing. They are now adopting Fusion 360 and bringing it all in-house, allowing them to model, simulate, visualize, collaborate and manufacture on a single platform. They aim to get to 70% self-machining by the end of this year, and Fusion 360 is at the heart of making that possible. In fact, they attribute 60% productivity efficiencies as a result of using Fusion 360. That is game-changing because it’s directly impacting their bottom line, and their ability to stay innovative and cutting-edge.

image03

What are the capabilities designers and engineers need to know about in Fusion 360 now to help them throughout their careers?
Fusion 360 is more than a collection of capabilities, it’s a new way of collaborating as a designer or engineer.  It enables global teams to collaborate on a project, all the files, with all the tools needed, and the cloud to help power them–it’s the building blocks of design, made accessible, so more people can go from an idea to a manufactured product.  Today it includes industrial design, mechanical engineering, simulation, documentation, data management and CAM.

Next time, we’ll take a look at the future of Fusion 360. From what I’ve heard so far, there are interesting things afoot and a few hints that now is the time to try Fusion 360.

The post Fusion 360: A Look Back appeared first on SolidSmack.

Viewing all 288 articles
Browse latest View live